


Replacing a vacuum cleaner dust bag may seem simple, but doing it the wrong way can lead to weak suction, dust leaks, unpleasant odors, and even system errors. Whether you use an upright, canister, or robot vacuum, proper bag replacement helps maintain airflow, protect the motor, and keep cleaning performance consistent.
This guide shows you how to replace a vacuum dust bag correctly, when it should be changed based on real performance signs, and which mistakes are most likely to cause problems. It also explains how to choose the right bag for your vacuum and cleaning needs, and how to clean reusable bags safely if your model supports them.
Quick Summary
- Replacing a vacuum dust bag correctly helps maintain suction, reduce dust leaks and odors, and prevent unnecessary strain on the vacuum system.
- The most important replacement steps are choosing the correct bag, fitting it securely with no gaps, avoiding forced closure, and checking for leaks after installation.
- Common replacement problems include misaligned collars, loose seals, pinched filters, incompatible bags, and overfilled bags that restrict airflow.
- Dust bags often need replacement before they are completely full, especially if you notice weaker suction, stronger odors, warmer exhaust, or a bag-full alert.
- Self-emptying systems like Narwal Flow reduce direct dust contact and lower maintenance frequency, but the dust bag still needs to be installed and seated correctly for the dock to work properly.
Step-by-Step: How to Replace a Vacuum Cleaner Dust Bag
You can start now and finish in minutes. Set the vacuum on a flat surface, prepare a trash bag within reach, and make sure the replacement is a compatible bag for your model.
Bagged Upright/Canister Vacuums
- Power off and unplug. Static parts only; moving fans can push dust out.
- Open the vacuum bag compartment. Release the latch or lid gently. Do not force it—if stuck, press the side tabs while lifting.
- Stabilize the housing. Hold the bin with one hand to keep the inlet still; this prevents shaking loose debris into the cavity.
- Remove the old bag straight out. Most bags have a collar (cardboard or plastic). If yours has a sliding gate/flap, close it before lifting to avoid dust escaping.
- Check the port and inlet. Tap the rim lightly; wipe loose debris with a dry cloth. Do not use wet wipes near electronics.
- Install the new dust bag. Align the collar with the port; push until it stops or clicks. The seal must sit flush all around—no wrinkles, no gaps.
- Close the lid fully. Press until you hear/feel a lock. If the lid won’t close, the bag is misaligned—reseat, don’t press harder.
- Quick leak test. Power on for 5–10 seconds. Tap near the compartment; no dust puff should appear. If suction pulses or the indicator still shows “bag full,” re‑seat the bag and check the flap.
- Dispose of the old bag. Keep it vertical, air out of the house, tie the trash bag immediately.
Common misfits (fix in place):
- Short insertion: If the collar shows a gap, push again until fully seated.
- Wrong bag type: If the seal won’t sit flat, you likely have a non‑compatible bag—use the model‑specific one.
- Filter pinch: If a pre‑motor filter edge is caught under the bag, lift the bag, lay the filter flat, and reinsert.
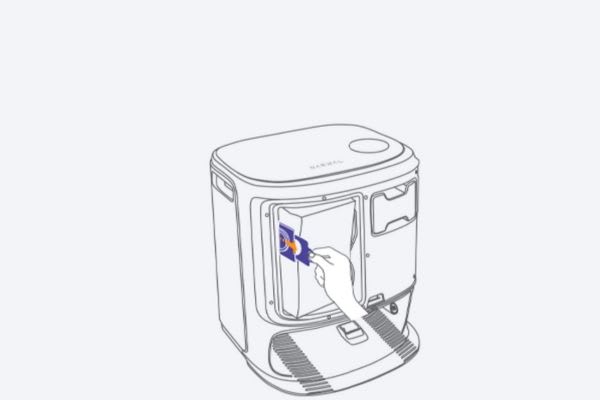
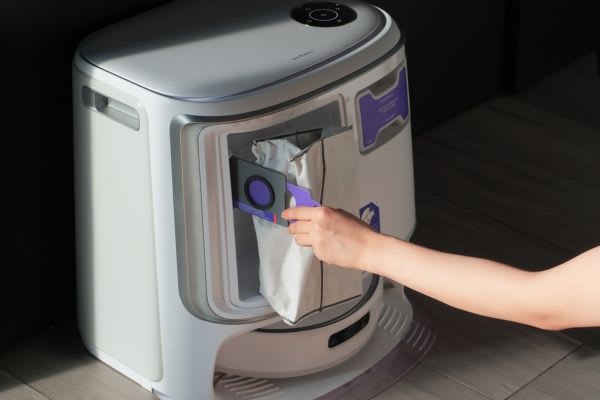
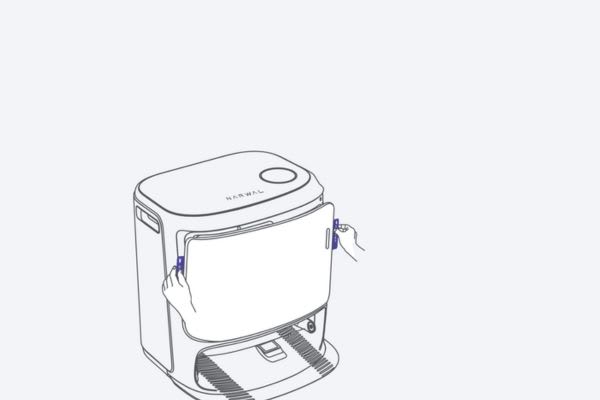
Self‑Emptying Robot Dock (Narwal Flow)
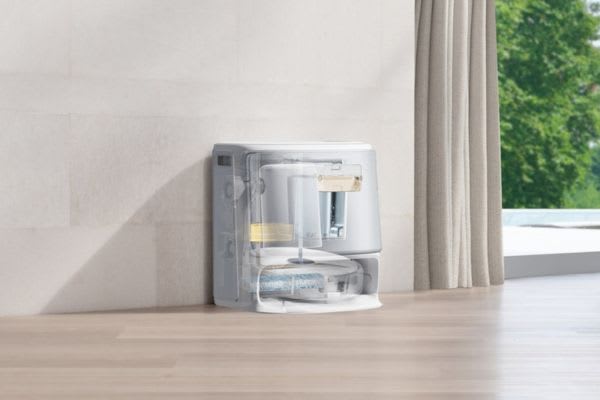
- Pause the robot and dock. In the app, stop current tasks; then power the dock idle (keep plugged in).
- Open the dock compartment. Lift the front/top lid. Do not tilt the dock; internal sensors and pathways sit behind the bag.
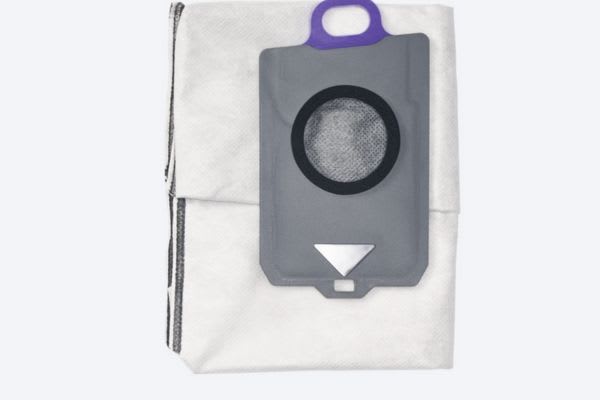
- Slide out the used Narwal Flow dust bag (2.5 L). Grip the handle; use the built‑in sealing flap if present, then lift straight up. Keep the bag upright to avoid residue backflow.
- Seat the new bag. Align the bag collar with the dock port; push until fully engaged. You should feel a firm stop and see the collar sit level.
- Close and confirm. Close the lid; wait 3–5 seconds for the dock to register. If the app or indicator shows a bag error, reopen, press the collar again, and confirm the seal is not twisted.
- Sanitary finish. Place the used bag into a trash bag, tie immediately. The dock will handle internal hygiene between swaps.
Why this is cleaner in practice:Narwal Flow’s dock handles internal maintenance (hot‑water internal cleaning and warm‑air drying) between replacements, so you spend less time at the compartment and avoid direct dust contact. You only perform Steps 2–5 above; the dock manages the rest.
Micro‑checks that prevent callbacks:
- Seal check: Run a 10‑second “vacuum only” cycle; no odor or dust puff at the lid gap.
- Registration check: If the app still flags the bag, remove once, rotate the collar 180°, reinsert firmly.
- Pathway check: If transfer seems weak, open, inspect for a wrinkled bag mouth; flatten and reseat.
You’re done when: the lid closes flush, the indicator clears, and a short test shows steady suction with no dust plume. If any doubt remains, re‑seat the collar; never force the lid.
[cta:narwal-flow-robot-vacuum-mop]
Why Replacing Your Vacuum Cleaner Dust Bag Correctly Is Important
Replacing the dust bag early and correctly keeps suction strong, protects the motor, and prevents fine dust from escaping. A packed vacuum cleaner dust bag restricts airflow and strains internal parts, which leads to weaker cleaning and long-term damage.
Proper replacement also helps avoid leaks, odors, and messy cleanup when opening the vacuum bag compartment. Using the right bag that seals correctly reduces filter stress and keeps dust where it belongs.
Compared with manual systems, Narwal Flow’s all‑in‑one dock extends maintenance intervals and reduces contact with debris. Its sealed 2.5 L dust bag offers up to about 120 days of storage, while 176°F hot‑water cleaning and 104°F warm‑air drying keep the internal system fresher between swaps. For lower effort and cleaner results, a self‑emptying robot vacuum dust bag system like Narwal Flow’s is a smarter alternative.
Common Mistakes to Avoid When Replacing a Vacuum Cleaner Dust Bag
You can avoid most problems by spotting them early. Here are the errors that cause leaks, mess, and weak pickup—and how to fix them fast.
- Forcing the latch or lid. If the compartment sticks, find the side tabs and press while lifting. Do not pry.
- Pulling the bag away unsealed. Close the built‑in flap (if present) before lifting; keep the bag upright over a trash bag.
- Running the vacuum without a bag. Never “test suction” bare. Install the bag, close the lid, then power on.
- Misaligned bag collar and wrinkled seal. Reseat the collar; press evenly until it stops or clicks. The seal must sit flat.
- Using a non‑compatible bag. “Universal” bags often leak. Use a model‑specific, compatible bag for a proper seal.
- Pinching the pre‑motor filter. If the filter edge sits under the bag, air bypass occurs. Lay the filter flat, then reinstall the bag.
- Overfilling past ~70–80%. A packed bag blocks airflow. Swap early, especially with pets or carpets.
- Wet cleaning inside the compartment. Use a dry cloth near the inlet and contacts. If you must damp‑wipe plastic, let it air‑dry fully.
- Reusing disposable paper/synthetic bags. Fibers break, seals fail, and leaks follow. Only wash bags explicitly marked reusable.
- Forgetting the quick check. After closing, run 5–10 seconds. No dust puff, no rattling, indicator light cleared—then you’re good.
For self‑emptying docks, watch two extras:
- Bag not registered by the dock. Open, press the collar in firmly, wait a few seconds, check the indicator again.
- Wrinkled bag mouth blocking the airflow path. Remove, flatten the mouth, reseat, and close.
How Narwal Flow helps you avoid these errors: A keyed bag collar guides proper seating, and the dock confirms the install before use. The replaceable cleaning filter catches lint that could clog pathways, and DirtSense plus dock diagnostics help you spot issues early. With a self‑emptying robot vacuum dust bag like the Narwal Flow dust bag, you reduce open‑compartment time and the chance of a bad seal.
When to Replace Your Vacuum Cleaner Dust Bag
Replace the vacuum bag at around 70% full or at the first signs of performance drop. Do not wait for a completely full vacuum cleaner dust bag. Fullness reduces airflow and makes changes messier. Use what you can measure: capacity, suction feel, smell, and your cleaning load.
In practice, check the bag after heavy jobs, pet‑shedding seasons, and carpet‑focused runs. Watch the bag full indicator if your model has one. A sudden pitch change from the motor, a warmer exhaust, or visible dust around the filter are early signals. Homes with pets, thick carpets, or frequent daily cleaning will hit the threshold faster than small apartments with hard floors.
Quick checks before every few sessions
- Capacity: If the bag looks over two‑thirds full, replace it.
- Suction: If pickup weakens or you need more passes, replace it even without an alert.
- Odor: Any musty smell at the compartment after a short run means the bag is due.
- Debris type: Fine dust and pet hair load the bag faster than larger crumbs—check sooner.
Narwal Flow reference. A self‑emptying robot vacuum dust bag like the Narwal Flow dust bag holds 2.5 L and can stretch to about 120 days between swaps, depending on floor size, carpets, pets, and frequency. Use time as a guide, but still open the dock periodically and visually confirm the bag condition.
How to Choose the Right Vacuum Cleaner Dust Bag for Your Model
Pick a model‑specific dust bag that seals properly, filters efficiently, and suits your floor type and cleaning habits. Don’t gamble with “universal” bags—they often leak, clog, or confuse sensors.
Start with compatibility. Check your vacuum’s model number and match it with the dust bag’s product code. The collar design must align exactly with the bag port, including its shape, insertion depth, and flap mechanism. If your vacuum has a bag full indicator, using an unapproved bag can block airflow or trigger false alerts.
Next, look at the material.Synthetic microfiber bags offer better airflow and dust retention than paper. For allergy‑sensitive homes or fine debris, HEPA‑grade multi‑layer bags are worth the extra cost. But filtration must be balanced with breathability—an over-filtered bag can still cause suction loss if it restricts airflow too much.
Finally, match the bag to your cleaning load. High-traffic homes with carpets, pets, or fine dust need more durable seams and larger capacity. Smaller homes or hard-floor-only setups can use standard-volume bags without issue. Watch for build quality—look at stitching, seal seams, and flap strength.
For Narwal Flow, bag selection is not optional. Its keyed collar interface, real-time dirt detection, and smart dock diagnostics rely on precision-fit dust bags. The system checks seal integrity, air path resistance, and insertion state before every use. Using third-party bags may cause false alerts, poor suction, or even trigger error states. To maintain function, always use the authorized Narwal Flow dust bag, designed for seamless integration with its internal cleaning and filtration system.
How to Clean a Reusable Vacuum Cleaner Dust Bag
Not all vacuum bags are washable. Disposable paper or synthetic bags will break down or leak if washed—only clean a bag that is clearly marked reusable or washable by the manufacturer.
To clean a reusable cloth bag, first remove it from the vacuum and empty it over a trash bin outdoors. Then shake it gently to loosen fine dust. If the bag material allows, rinse it with warm water and mild soap. Avoid harsh detergents or scrubbing, which can damage the filter layers. Turn the bag inside out, rinse again, and let it dry completely in open air—ideally for 24 hours.
Never reinstall a damp dust bag. Moisture trapped inside promotes mold growth and odor, and can damage your vacuum. Check seams and filters before reuse. If the bag smells musty or loses its shape, replace it entirely.
Smarter Vacuum Cleaner Dust Bag Maintenance Starts with Narwal
Replacing a vacuum cleaner dust bag shouldn’t be a chore—or a mess. But for many, it still means dealing with dust clouds, awkward bag fits, or confusing error lights.
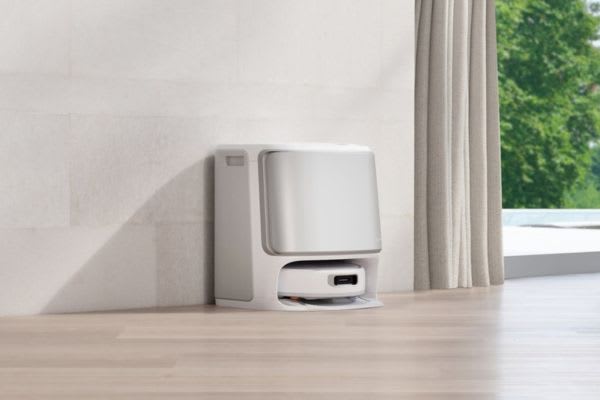
That’s where Narwal steps in. With a sealed 2.5L dust bag, automatic emptying dock, and internal hot-water cleaning, Narwal robot vacuums remove the stress from dust bag maintenance entirely. No loose debris, no lid struggles, no guesswork.
Unlike traditional vacuums that need weekly attention, Narwal’s hands-free system can go up to 120 days without a swap. The dock handles cleanup and hygiene between changes—so all you do is replace the bag when notified.
If you're in Australia, you can shop directly on Narwal AU and explore the best self-emptying robot vacuums for your space. With flexible payment options like Afterpay, Zip, and Klarna, upgrading your cleaning routine is easier than ever.
Cleaning smarter starts with reducing the work you don’t want to do. Narwal does the dirty part—so you don’t have to.
How do I know if a vacuum dust bag is installed incorrectly?
Common signs include the lid not closing properly, dust leaking near the compartment, weak suction, pulsing airflow, or the bag indicator still showing an error after replacement. These usually point to a collar or seal that is not seated correctly.
Is it bad to wait until the dust bag is completely full?
Yes. Waiting too long restricts airflow and can reduce cleaning performance before the bag actually looks full. Replacing it earlier helps maintain suction and reduces the chance of dust leakage during removal.
Why does suction drop even after installing a new dust bag?
That can happen if the bag is not fully seated, the seal is wrinkled, the filter is pinched, or the wrong bag type is being used. A fresh bag only helps if the airflow path is sealed properly.
Can I use a universal vacuum dust bag instead of a model-specific one?
It is usually safer to use a compatible model-specific bag. Universal bags may fit loosely or seal poorly, which can lead to leaks, reduced suction, or system errors.
Should I clean the compartment every time I replace the dust bag?
A light dry wipe around the port and rim is a good habit, especially if loose debris is visible. The key is to avoid moisture near electronics or sensitive internal components unless the manufacturer specifically allows it.
What is the difference between replacing a dust bag in a standard vacuum and in a self-emptying dock?
A standard vacuum usually requires direct handling of the compartment and a more manual seal check. A self-emptying dock can reduce dust contact and extend replacement intervals, but it still depends on proper collar alignment and system registration.
Is odor a reliable sign that the dust bag should be replaced?
Yes, odor can be an early warning that the bag is too full or holding moisture, fine dust, or pet debris. Even without a full indicator, a musty smell often means airflow and hygiene are starting to decline.
Can disposable dust bags be reused if they still look intact?
No, not unless they are explicitly designed to be reusable. Reusing disposable bags can weaken the material, damage the seal, and increase the risk of dust escaping back into the vacuum system.
What should I check first if the vacuum still reports a bag error after replacement?
Check whether the collar is fully inserted, sitting level, and not twisted. In self-emptying systems, the dock may also need a few seconds to register the new bag correctly after the compartment is closed.


